After too many long nights in the studio to count and lots of insanity that ensued, my final project for Jewelry 3 is complete!
The project was to make four experimental rings that did not look like rings. We were to use wire, tube, sheet, and stock. Each ring, at its completion, had to look like something different from what it started as, while still using the characteristics of each form of metal.
The four rings took me a total of 6 days to complete, with 1 day dedicated to each ring, 1 day to make my stock, and another day to construct my first stock ring, which I was not happy with and ended up re-making.
So here they are:
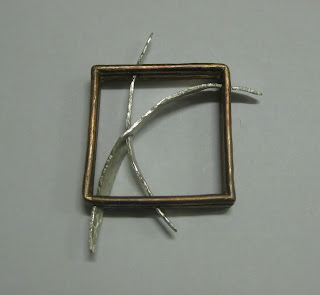
Wire: This was made by soldering 3 pieces of copper wire to form a thin sheet. I then filed and beveled the corners and bent the wire to form a square. Once I soldered the form and it was secure, I drilled holes to fit the flattened, silver wire pieces. This turned out to be very tricky, and the wire did not want to do what it was supposed to do. The entire piece has a hammered texture, so the insides of the ring have a shinier finish than the outside. I liked that it seemed as if the outer copper was protecting the shiny silver.

Tube: This ring started out as many sections of brass tube, hammered closed and curved. I strategically soldered the pieces together so that they would curve and flow over the fingers. Once the form was complete, I applied a blue-green oxide dye patina and then removed some around the edges to let some of the brass show through.


Sheet: For this ring, I was inspired by paper quilling, and wanted to replicate the filigree designs in metal. I rolled strips of copper to 30 gauge and gave each one a hammered texture. I then began to curl and bend the pieces to construct the swirls. My design grew and changed as I added different pieces. Once I had a design that I was happy with, I soldered the pieces together. After this process, the thin metal strips were annealed and the piece was too fragile, so I reluctantly unrolled each swirl that I had so carefully constructed, and hammered them again. This made the metal much stronger, and I realized it was necessary. Once I fixed the design, I placed it where it would go on the hand and bent the pieces so that it would flow nicely with the curves of the hand. I then bent one of the outer swirls to form around the finger and hold it in place.


Stock: This was the form that I was the most worried to work with. I started by soldering copper sheets together, every once in a while rolling it down. Once I had a solid block of metal, I cut a thin rectangle off it. With this, I cut two lines in the center of opposite sides, not quite all the way to the end. Then, I was able to bend and open the form up, revealing this diamond shape with twisted sides. I twisted the sides a couple more times and ended up with my first iteration of the ring.

 I wasn't crazy about the final product, so I started a new piece. This time I cut two rectangles off my chunk of stock and soldered them together to create a bigger form to work with. I did the same cutting and opening technique with this piece, but I quickly realized that the thicker metal was not going to act the same way as the thinner one. I got the piece partially opened and placed it on my hand. I really liked the shape that it took, and that it seemed to fit perfectly over my finger. I hammered the sides over a wooden dowel that was about the size of my finger and filed the flat ends to come to a point. I am much happier with the second ring, but I do still wish that the sides could have had some twist in them.


 Overall, I am very pleased with each ring that I made. They all turned out pretty different and incorporated many different techniques, as well as different forms of metal that I was not used to working with.